
Home / By room / Corridors & Stairs
Corridors & Stairs lighting: The complete guide
A long corridor with a row of spotlights lighting only the floor looks narrow and tunnel-like. Corridors feel wider when their walls are lit, and stairs need light that defines each step without dazzling the person coming down.
Recommended values
Guide values; the final design depends on the space, its colours and its use.
The most common mistake: a row of spotlights down the middle of the corridor
The usual approach is a row of spotlights along the centre of the corridor ceiling, each one drawing a pool on the floor. The result is a corridor that feels narrow and tunnel-like, with alternating bright and dark patches that tire the eyes, and dark walls that make it look narrower than it is. Fixtures are often more powerful than needed, so the light dazzles whoever walks through.
Light the walls, not the floor
- A fixture that washes both walls at once (Double Washlight), or asymmetric fixtures aimed at the walls, visually widens the corridor and prevents glare.
- Wall lights that light the ceiling (Up-light) give calm reflected light, and suit corridors with light-coloured ceilings.
- Paintings and niches along the corridor are an opportunity for accent lighting that breaks up its length and gives it rhythm.
- A corridor needs little light, around 100 lux; 6 – 10 W fixtures are usually more suitable than the 20 W ones designed for high-ceilinged halls.
Spacing and uniformity
A useful rule of thumb from design guides: the distance between fixtures should not exceed roughly the clear ceiling height, so that no dark patches appear between the pools of light. The narrower the beam angle, the closer together the fixtures need to be. In long corridors, it helps to begin and end the layout with a lit element, such as a painting or a wall at the end of the corridor, because the eye goes to the end of the corridor first.
Stairs: light from the side
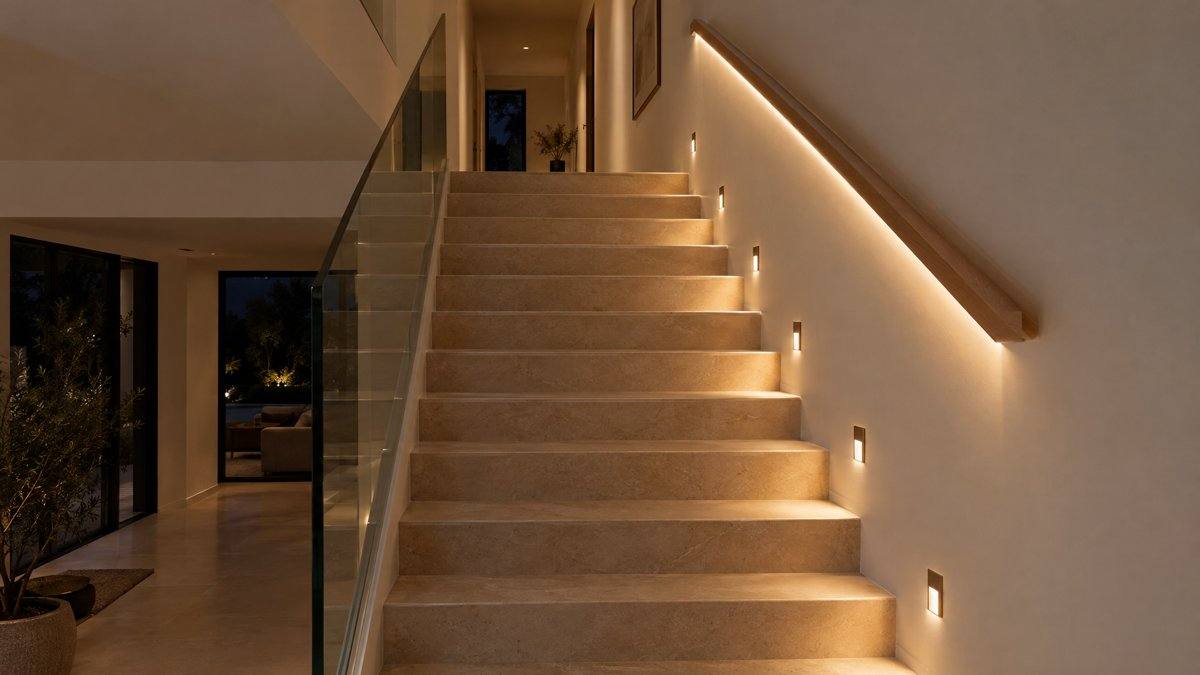
Lighting a staircase from the ceiling hits the steps from above, so the body of someone going down casts a shadow on the very tread they are about to step on, and the edge of each step becomes harder to see. Going up, people look straight into the fixture. The most important solution, for both safety and beauty, is low-level lighting.
- Small recessed wall fixtures (Step Lights) at about 30 cm above the tread, on every step or every second step.
- Or a concealed strip under the nosing of each step, or under the handrail, clearly drawing the line of the steps.
- If ceiling lighting cannot be avoided, use a very narrow beam that reaches the floor, kept away from the line of sight when going down.
- Low-level fixtures are within children's reach: choose fixtures whose surface does not get hot, with shielding that prevents glare in the eyes of anyone coming up.
Night lighting and sensors
- A motion sensor that switches on dim lighting in corridors at night and turns it off after a few minutes.
- A very low night level for stairs and corridors leading to bedrooms, instead of full lighting that dazzles eyes adjusted to the dark.
- The corridor's colour temperature should match the adjoining spaces, so the colour of the light does not change when moving between rooms.
Checklist before first fix
- Small wall boxes for the stairs at a consistent height before plastering and cladding; this cannot easily be added later.
- A power feed for a strip under the handrail or the steps, if chosen.
- Motion sensor points at the beginning and end of corridors.
- Two-way switches at the top and bottom of the stairs.
How to build the layers
- A Wall Washer or a fitting that washes both walls at once (Double Washlight) instead of spotlights along the corridor’s axis.
- Low wall lights at around 30 cm for the stairs, or a strip under each step or the handrail.
- Avoid fittings that are directly visible from the top of the stairs when coming down.
- A motion sensor for night-time corridors with soft lighting.
- Low wall fittings are within reach of children’s hands, so choose fittings whose surface doesn’t get hot.
- Corridors need only a little light, and can be lit indirectly with wall fittings that light the ceiling.
Common mistakes: Corridors
Common mistakeAiming light at glass and mirrors
“Got a spotlight hitting the windows at night? You're blinding your guests!”
- The problem
- Aiming lights at reflective surfaces such as glass creates distracting glare that blocks the view outside.
- Technical explanation
- Light should be aimed at walkways and opaque walls. Avoid aiming lights at windows at night entirely, so you can enjoy the view of the garden.
- The result
- A comfortable evening sitting and a clear view of the villa's garden without distraction.
Common mistakeLighting windows and mirrors
“Lighting your mirrors and windows to make your home look luxurious? You're blinding yourself!”
- The problem
- Aiming lights directly at glass and mirrors bounces the light back as very uncomfortable glare.
- Technical explanation
- Glass doesn't reflect light softly like painted walls do, so lighting should be from the side or hidden behind the mirror (Backlit) to avoid discomfort.
- The result
- Hotel-style bathrooms and corridors, without visual discomfort.
Common mistakeRandomly placed bollard lights
“Has your garden turned into an airport runway because of your path lights?”
- The problem
- Placing bollard lights too close together, randomly and excessively
- Technical explanation
- The ideal path bollard is spaced every 4 to 5 metres, and its height should ideally be half the width of the area being lit
- The result
- Elegant, calm garden paths with no extra fixture costs
Common mistakeLighting glass windows
“Have lights aimed at your living room windows? You've just blinded your guests!”
- The problem
- Aiming light at glass makes it act like a mirror, reflecting harsh light into the eyes and blocking the view of the garden.
- Technical explanation
- Light should be directed at walkways and solid walls (Wall Washer), completely avoiding reflective surfaces.
- The result
- A comfortable living room at night with a clear view of the garden.
Common mistakeChoosing the wrong wattage for façades
“Want your villa façade to stand out from afar? Don't fit it with a 5 W light!”
- The problem
- Using very weak Grazer fittings for tall façades.
- Technical explanation
- A tall façade needs a 36 W fitting (about 2300 lm) to reach the top of the building, while 5 W (300 lm) is left for soft lighting of lower walkways.
- The result
- A palace façade that catches the eye of the whole neighbourhood.
Installation errorUsing 5 W spots for tall façades
Trying to highlight a two-storey building with a very weak fixture meant for garden paths.
Common mistakeThe one-metre, two-metre rule (grid layout)
“A spotlight every 2 metres? That rule will make your villa look like a supermarket!”
- The problem
- Spacing lights evenly (in a grid) wastes electricity and leaves the ceiling full of holes that are tiring to look at.
- Technical explanation
- Real lighting design is based on “task distribution”: lighting only the furniture, corridors and artwork, and leaving restful areas (shadows) to create contrast.
- The result
- A cleaner ceiling with 40% fewer openings, savings on the electricity bill, and twice the sense of luxury.
Common mistakeThe wrong staircase lighting
“You installed powerful spotlights above the stairs, and the result... a dark, dangerous staircase!”
- The problem
- Using wide-angle ceiling spotlights for an open staircase, so the light scatters before it reaches the steps.
- Technical explanation
- Stairs need either very narrow-beam ceiling spots so the light reaches the floor, or better still, low-level wall lights that illuminate the treads directly.
- The result
- Safety for your family going up and down, and an elegant, hotel-like staircase.
Common mistakeMiscalculating downlight spacing (d=h)
“Why are there dark patches between every light in your home's corridors? Because the contractor doesn't know this rule!”
- The problem
- Spacing downlights too far apart and at random.
- Technical explanation
- The engineering rule for uniformity is (d = h): the distance between the centres of two fittings should equal the fitting's height above the working surface.
- The result
- A softly and evenly lit corridor that feels more spacious and luxurious.
Common mistakeSticking stubbornly to the “2-metre rule”
“The contractor tells you: put a spotlight every 2 metres! Stop, don't ruin your ceiling!”
- The problem
- Applying a fixed spacing (2 m) between fittings in every room regardless of ceiling height.
- Technical explanation
- The correct spacing depends on height. The correct engineering rule is that the spacing between fittings should be proportional to the ceiling height minus the height of the working surface.
- The result
- Even light distribution that prevents dark patches forming in the villa's corridors.
Common mistakeChoosing watts and ignoring lux
“Asking the electrician to fit a 20W light in your office? You’re speaking the wrong language!”
- The problem
- Watts define electricity consumption, while offices need the intensity of light falling on the surface (lux) to be measured
- Technical explanation
- An office needs 500 lux on the desk surface, while corridors need only 100 lux
- The result
- Healthy lighting for your eyes: not so strong it blinds you, not so weak it puts you to sleep
Common mistakeMisapplying the d=h rule on high ceilings
“High ceiling, and you spaced the lights by the height rule? Your ceiling will look a mess!”
- The problem
- Excessive Spacing between fixtures on very high ceilings (Double height)
- Technical explanation
- The (spacing = height) rule is for ordinary corridors. On high ceilings you must reduce the spacing and use very narrow angles (<15°) to make sure the light reaches the floor
- The result
- A bright, luxurious villa lobby even with ceilings over 7 metres
Common mistakeMissing task lighting in the kitchen
“Cooking with your own shadow covering the food? Your kitchen lighting is incomplete!”
- The problem
- Relying on Downlights in the walkways and neglecting the work areas (counters)
- Technical explanation
- Task Lighting using LED strips under the upper cabinets prevents shadows and delivers 500 lux directly on the chopping area
- The result
- A safe, comfortable kitchen to work in that looks like a palace kitchen
Common mistakeUsing 20 W in corridors
“The contractor put 20 W lights in your corridor? More watts here isn't luxury… it's a nuisance!”
- The problem
- Over-lighting transition spaces strains the eyes and robs the space of contrast.
- Technical explanation
- Corridors need no more than 100 lux, and 6 to 10 W fittings are enough, while 20 W is left for the Majlis.
- The result
- Calm corridors that are easy on the mind and save on costs.
Frequently asked questions
QuestionHow many watts do I need for a corridor?
Usually 6 – 10 W per fixture is enough in ordinary corridors, because a corridor needs only around 100 lux. More powerful fixtures dazzle without adding beauty.
QuestionWhat is the best lighting for stairs?
Low-level wall lighting or a strip under the steps, because it lights the tread from the side without body shadows and without glare in the eyes.
QuestionWhy does my corridor look narrow?
Because the light falls only on the floor and the walls are dark. Lighting both walls widens the corridor visually.
Customer questionWhat's the right spacing to leave between spotlights in a corridor?
The answer: The spacing equals the height: d=h.
Customer questionI have an open staircase in the middle of the living hall. How do I light it without creating shadows?
The answer: Low wall lighting at a height of 30 cm.
Customer questionHow do I make sure corridor lighting is continuous, with no dark patches?
The answer: The spacing d equals the height h.
Customer questionThe contractor put 20 W bulbs in the corridor ceiling. Is that right?
The answer: Wrong, a corridor needs only 6–10 W so it's not uncomfortable.
Customer questionIs ceiling lighting enough for the staircase?
The answer: No, it causes dangerous shadows; low wall lighting at 30 cm is better.
Customer questionIs 6 W enough to light a corridor?
The answer: Yes, corridors need calm lighting so they don't strain the eyes.
Comparisons and facts
FactBollard lights shouldn't be placed randomly
Their ideal height is half the width of the path being lit, with 4-5 metres between them.
Spec explainedLight uniformity (Uniformity)
“Notice bright patches of light next to dark patches in your home's corridors? That's called poor uniformity!”
- The problem
- Placing fittings at random distances (Spacing) strains the pupil, which has to keep widening and narrowing as you walk.
- Technical explanation
- The distance between fittings (d) must be calculated from the ceiling height and the beam spread of the light to ensure comfortable light Uniformity.
- The result
- Spacious, calm corridors that are very comfortable to move through inside the villa.
ComparisonStaircase lighting: low-level wall lights vs ceiling spots
“The most dangerous place in your home is the staircase! Here's how to light it properly.”
- The problem
- Lighting the stairs from the ceiling casts the person's shadow onto the steps, which causes tripping.
- Technical explanation
- The best solution is low-level recessed wall lights (Wall recessed) at a height of 30 cm that light the treads directly, with no shadows.
- The result
- Complete safety for you and the children, and an elegant architectural look.
Spec explainedBeam Angle for the majlis
“Why does a large majlis look dark despite all the spotlights?”
- The problem
- Choosing very narrow beams in large spaces that need a wide spread of light.
- Technical explanation
- For majlis rooms and wide corridors, you need a wide (Flood) beam of more than 60° to cover the largest possible area and reduce the number of fittings.
- The result
- Savings on fittings and fewer holes in the ceiling, with sufficient, elegant lighting.
ComparisonLED strip vs. T5
“Want to install 40 metres of concealed lighting without Drivers and complicated wiring?”
- The problem
- 24V LED strips need Drivers every 5 metres, which makes installation difficult in storerooms or long corridors
- Technical explanation
- Linear T5 tubes connect to each other for runs of up to 48 metres directly on mains power without an external Driver, making them ideal for these spaces
- The result
- Very fast, robust installation that saves on Driver and maintenance costs
Comparison10° beam vs. 60° beam
“Your expensive painting looks like a cheap poster? The secret is in this number!”
- The problem
- Washing out artworks with wide lighting
- Technical explanation
- A 60° beam (Flood) spreads light for corridors. A 10° beam (Narrow Spot) focuses the light like a laser to highlight only the painting or vase, doubling its impact
- The result
- Décor that catches guests’ eyes the moment they walk in
ComparisonDownward Spot vs. Double Washlight
“This fixture is what makes a luxury hotel corridor different from the one in your home!”
- The problem
- Corridors look narrow and gloomy because only the floor is lit
- Technical explanation
- A Double Washlight is designed to softly wash both corridor walls at once, creating a sense of visual width and preventing glare in the eyes of people walking through
- The result
- Wide, calming corridors
Spec explainedCut-off Angle
“Why can’t you ever see the light source in luxury restaurants? Apply this technique at home!”
- The problem
- Being dazzled when walking through corridors and living rooms
- Technical explanation
- Fixtures with deep reflectors provide a Cut-off Angle for direct light, so the eye only sees it when standing directly under the fixture
- The result
- A calm ceiling and a complete end to headaches from ceiling glare
Spec explainedWall-mounted Step Lights
“Want to light your staircase without tripping over misleading shadows?”
- The problem
- Ceiling Downlights create shadows on the edges of the steps that cause tripping
- Technical explanation
- The best solution for both safety and looks is to install low wall light boxes (30 cm above the tread) that light the steps directly without bothering the eyes
- The result
- Safety for your family and a stunning hotel look for the stairwell
Spec explainedSpacing d=h (the uniformity rule)
“How do you make corridor light continuous and smooth with no dark patches? The secret is simple maths!”
- The problem
- Alternating dark and bright patches in corridors that bother the eye
- Technical explanation
- To achieve Uniformity, the distance between fixtures (d) should equal the ceiling height minus the working plane (d=h)
- The result
- Calm, visually spacious corridors that feel comfortable
References
- ERCO: arranging luminaires
- Lighting Research Center: Lighting Patterns for Homes
- Address Lighting knowledge base: stair and corridor lighting
The content is adapted and developed from these references for Gulf homes, not a literal translation.